How do I connect blynk?
- Create a Blynk Account. After you download the Blynk App, you'll need to create a New Blynk account.
- Create a New Project. After you've successfully logged into your account, start by creating a new project.
- Choose Your Hardware.
- Auth Token.
- Add a Widget.
- Run The Project.
.
Thereof, how do I connect esp8266 to blynk app?
Example Sketch: Blink with Blynk
- You'll also need to install the Blynk Arduino Library, which helps generate the firmware running on your ESP8266.
- The Auth Token is very important -- you'll need to stick it into your ESP8266's firmware.
- Add a Button, then click on it to change its settings.
- Upload the Blynk Firmware.
Beside above, how do I connect NodeMCU to blynk? NodeMCU
- Put your auth token from Blynk app and your WiFi credentials in sketch: // You should get Auth Token in the Blynk App.
- Click on Verify button and make sure that example compiled correctly:
- Select the port of your board in Tools -> Port menu.
In respect to this, how does blynk app work?
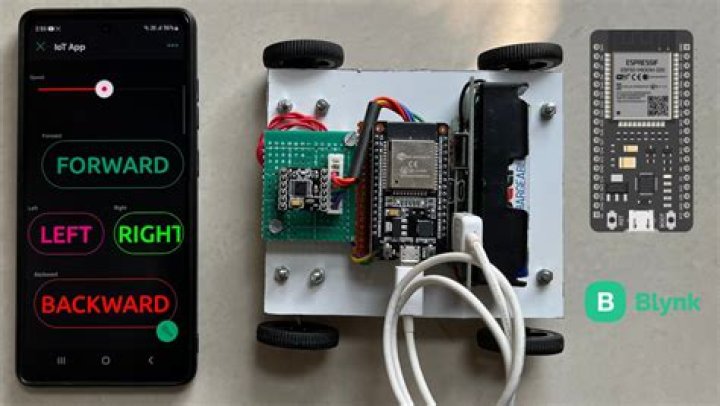
Blynk is a new platform that allows you to quickly build interfaces for controlling and monitoring your hardware projects from your iOS and Android device. After downloading the Blynk app, you can create a project dashboard and arrange buttons, sliders, graphs, and other widgets onto the screen.
How do you control led with blynk?
To control LED with Blynk app, download and install the Blynk app from Google or Apple app store. Then, if you are new to Blynk app, create a new account by using your Email and password. After sign up click on 'New Project' to start your project.
Related Question AnswersHow do I send data to blynk?
It means that Blynk app will be waiting for the data whenever your hardware sends it.Open Blynk app:
- Create a New Project (new Auth Token will be sent to your email)
- Add Value Display Widget.
- Go to Widget Settings.
- Set PIN to V5.
- Set Frequency to PUSH.
How do I control my led NodeMCU?
- Step 1: Materials Required. ESP8266 NodeMCU.
- Step 2: Installing NodeMCU Board Package. Open up Arduino IDE.
- Step 3: Pin Connections. D7 of NodeMCU to LED's +ve.
- Step 4: Source Code. In code.
- Step 5: Uploading the Code.
- Step 6: Controlling the LED.
- 3 People Made This Project!
- 21 Discussions.
How do I connect my NodeMCU esp8266 to WIFI?
Step 1: Configure ESP8266 NodeMCU As an Arduino- Download its driver from this link CH341SER.
- Download Arduino IDE.
- —Start Arduino and open Preferences window.
- —Open Boards Manager from Tools .
- Enter esp8266 intro the search field to install ESP8266 platform.
- Go to Tools > Board menu, then select your ESP8266 board.
What is blynk app?
Blynk is a Platform with IOS and Android apps to control Arduino, Raspberry Pi and the likes over the Internet. It's a digital dashboard where you can build a graphic interface for your project by simply dragging and dropping widgets.What is NodeMCU esp8266?
NodeMCU is an open-source firmware and development kit that helps you to prototype or build IoT products. It includes firmware that runs on the ESP8266 Wi-Fi SoC from Espressif Systems, and hardware which is based on the ESP-12 module. It is based on the eLua project and built on the Espressif Non-OS SDK for ESP8266.How do I flash esp8266?
Flashing the firmware- Power everything by plugging into USB port.
- Start XTCOM_UTIL.exe.
- Hit Tools -> Config Device in the menu.
- Configure the settings to whatever COM port you are using, and 9600 baud rate.
- Click on "Open".
- Click on "Connect".
- Close the "Config Device" window.
How do I use Arduino WIFI module?
Follow these steps.- connect the red wire to VIN(3.3V) to the +3.3V power from the microcontroller.
- connect the black wire to the ground.
- connect the green wire to the TX of the Wifi module and microcontroller.
- connect the yellow wite to the RX of the wifi module and microcontroller.
Is blynk app free?
Blynk is FREE to download. And there are no recurring payments involved. All you need to do is create an account in our app. Download: Blynk for Android or Blynk for iOS.Why do we use blynk?
Blynk was designed for the Internet of Things. It can control hardware remotely, it can display sensor data, it can store data, vizualize it and do many other cool things.Is blynk open source?
While the ESP8266 is great open source hardware for getting started with the Internet of Things, Blynk is an ideal platform to control Arduino, Raspberry Pi, and the like over the Internet. Both the Blynk server and Blynk library are open source, while the Blynk app is available free for iOS and Android.How do I download blynk?
How to install Blynk library.- Download Blynk_Release_vXX.zip (scroll down to the Downloads section)
- Unzip the archive. You will notice that archive contains several folders and several libraries.
- Copy all of these libraries to your_sketchbook_folder of Arduino IDE.
What are blynk virtual pins?
Virtual Pin is a concept invented by Blynk Inc. to provide exchange of any data between hardware and Blynk mobile app. Virtual pins are different than Digital and Analog Input/Output (I/O) pins. They are physical pins on your microcontroller board where you connect sensors and actuators.Does blynk use MQTT?
Blynk does not use MQTT protocol.What software is used to program Arduino?
The open-source Arduino Software (IDE) makes it easy to write code and upload it to the board. It runs on Windows, Mac OS X, and Linux. The environment is written in Java and based on Processing and other open-source software. This software can be used with any Arduino board.How do I connect blynk app to Arduino?
About this project- Sign in to Blynk app and create a new project.
- Give a name to your project. Choose device as Arduino UNO.
- Check your E-mail for Author Token.
- Previous Next. Select "ADD DEVICE" and add Button.
- In Code copy and paste your Author Token.
- Open Command Prompt.
- Now write blynk-ser.
What is blynk library?
Blynk Library is an extension that runs on top of your hardware application. It handles all the connection routines and data exchange between your hardware, Blynk Cloud, and your app project. It will help you to easily build new projects or integrate Blynk into your existing project.How do I connect to NodeMCU?
Here's how to program the NodeMCU using the Arduino IDE.- Step 1: Connect your NodeMCU to your computer. You need a USB micro B cable to connect the board.
- Step 2: Open Arduino IDE. You need to have at least Arduino IDE version 1.6.
- Step 3: Make a LED blink using NodeMCU.
How do I connect Arduino IDE to NodeMCU?
- Step 1: Adding ESP8266 URL to Arduino IDE Board Manger. Make sure you are using Arduino IDE version 1.7 or higher.
- Step 2: Open Board Manager. Go to Tools >> Boards >> Board Manager.
- Step 3: Search and Installing Node MCU (ESP8266) in Arduino IDE. Type “ESP8266” in search box.
- Step 4: Verify installation of ESP8266.